MariaDB Galera Cluster简介及双主HA实践
本文授权转载自公众号“九州云99cloud”
MariaDB Galera Cluster由于其优异的特性,被广泛用于各类分布式系统中,例如OpenStack集群,freeradius集群等。本文将简要介绍Galera Cluster,并实际设计部署双主MariaDB Galera Cluster(基于freeradius认证的VPN集群系统)来验证其HA(High Availability)特性。
一 Galera Cluster要素
1 Database Replication
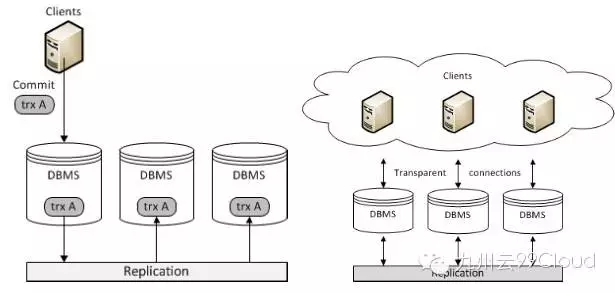
分布式数据库/数据库集群系统中数据库复制是十分重要的,常用的有以下两种架构:Master/Slave Replication架构(左)和Multi-master Replication架构(右)。
What is Galera Cluster?
Galera Cluster is a write-set replication service provider in the form of the dlopenable library. It provides synchronous replication and supports multi-master replication. Galera Cluster is capable of unconstrained parallel applying (that is,“parallel replication”), multicast replication and automatic node provisioning.
The primary focus of Galera Cluster is data consistency. Transactions are either applied to every node or not at all. Galera Cluster is not a cluster manager, a load balancer or a cluster monitor. What it does it keep databases synchronized provided that they were properly configured and synchronized in the beginning.
而Galera Cluster提供了并行的复制机制,能实现同步的,多主的复制方式。因此具有很多实用特性:(1)可以在任意节点上进行读写(2)自动剔除故障节点(3)自动加入新节点(4)真正行级别的并发复制(5)客户端连接跟操作单数据库的体验一致。
在数据复制方面有同步和异步两种方式,而同步方式的优势十分明显:(1)高可用(当节点宕机时数据不会丢失,数据复制一致性高,实现不复杂);(2)具有较高的性能;(3)跨集群。但是缺点是随着节点数量的增加,其事务的响应时间,冲突的概率和死锁率会呈指数增长。(因此像MySQL和PostgreSQL都采用异步复制方式)
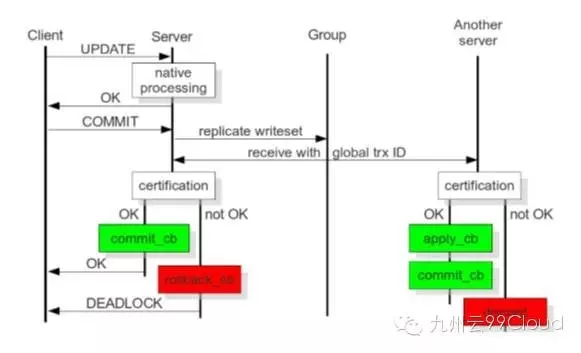
为克服同步复制的的缺点,现在主要的技术包括:Group Communication,Write-sets,Database State Machine和Transaction Reordering。Galera Cluster使用一种称为Certification-based Replication的策略实现集群同步复制,Certification-based Replication综合使用了Group Communication和Transaction Reordering技术。具体来说:事务可以在任意单节点上执行或者复制,但是在事务在提交时,会运行一个协调认证程序来保证事务的全局一致性,它借助广播服务,建立一个全序的并发事务。
Certification-based Replication的主要思想是数据库中的任何事务在未到达提交点(commit point)时,会假设没有任何冲突。在事务commit发生之前,这个事务将会引起的所有数据库变化和所变行的主键都会被收集到一个write-set中。然后会把这个write-set发送到集群中的其它节点上。有了write-set,此时集群中所有的节点会使用主键执行一个certification test,如果失败则丢弃write-set并且回滚事务,如果成功则事务会被提交并将write-set应用到集群中其余的节点。而Galera Cluster中使用Certification-based Replication策略则依赖于一个全局的事务序列。
2 Galera Cluster的内部架构
Database Management System (DBMS)The database server that runs on the individual node. Galera Cluster can use MySQL, MariaDB or Percona XtraDB.
• wsrep API The interface and the responsibilities for the database server and replication provider. It consists of:
• wsrep hooks The integration with the database server engine for write-set replication.
• dlopen() The function that makes the wsrep provider available to the wsrep hooks.
• Galera Replication Plugin The plugin that enables write-set replication service functionality.
• Group Communication plugins(GCS plugins) The various group communication systems available to Galera Cluster. For instance, gcomm and Spread.
State Snapshot Transfer (SST)
SST是集群提供给节点用来从一个节点到其它节点对一个完整数据的拷贝传输功能。Galera Cluster可以使用逻辑方法(使用mysqldump)和物理方法(rsync,rsync_wan,xtrabackup等)。
3 常用的Galera Cluster方式
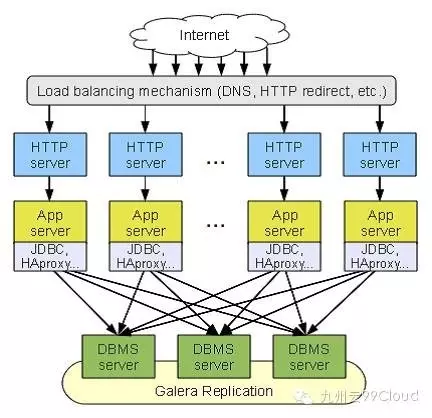
如下图,对此本文设计了一个基于freeradius认证的VPN集群系统,其核心的数据库采用MariaDB双主 Galera Cluster实现,同时借助keepalive和haproxy实现负载均衡。
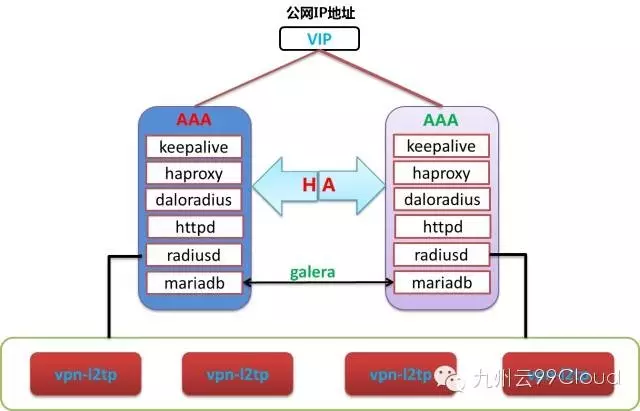
二 基于freeradius认证的VPN集群系统
主要在对数据库mariadb做双主Galera Cluster架构;使用keepalive配置虚拟IP地址;实现两个freeradius服务器构成的集群(多机方式而非冗余方式);使用haproxy做httpd服务(包括daloradius和其它的辅助服务)的负载均衡;vpn-l2tp server其规模具有线性拓展特性。
设VIP地址为192.168.10.99

说明:由于是双机配置,相同的操作或配置以#开头,否则[root@radiusone/two ~]# 开头。
1 系统初始化和准备yum源
# cat /etc/hosts127.0.0.1 localhost localhost.localdomain localhost4 localhost4.localdomain4
::1 localhost localhost.localdomain localhost6 localhost6.localdomain6
192.168.10.91 radiusone radiusone.ctgu.cn
192.168.10.92 radiustwo radiustwo.ctgu.cn#yum install -y epel-release
为了安装galera mariadb-galera-common mariadb-galera-server mariadb-libs mariadb mariadb-galera-common,方便起见,这里使用RDO的源。
#wget

  https://repos.fedorapeople.org/repos/openstack/openstack-kilo/rdo-release-kilo-1.noarch.rpm

  #rpm-ivh-rdo-release-kilo-1noarchrpm">rpm -ivh rdo-release-kilo-1.noarch.rpm

  #yum-update-y">yum update -y

  #yum-install-y-wget-net-tools-iptables-services">yum install -y wget net-tools  iptables-services

  #vim-etcsysconfigselinux">vim /etc/sysconfig/selinux

  SELINUX=disabled

  #setenforce-0">setenforce 0
设置防火墙
#iptables-a-input-p-tcp-m-state-state-new-m-multiport-dports-33063307456745684444-j-accept">iptables -A INPUT -p tcp -m state --state NEW -m multiport --dports 3306,3307,4567,4568,4444 -j ACCEPT
#iptables-save">iptables-save
#systemctl-enable-iptables">systemctl enable iptables
#cat-etcsysconfigiptables">cat /etc/sysconfig/iptables
#sample-configuration-for-iptables-service">sample configuration for iptables service
#you-can-edit-this-manually-or-use-system-config-firewall">you can edit this manually or use system-config-firewall
#please-do-not-ask-us-to-add-additional-portsservices-to-this-default-configuration">please do not ask us to add additional ports/services to this default configuration
*filter
:INPUT ACCEPT [0:0]
:FORWARD ACCEPT [0:0]
:OUTPUT ACCEPT [0:0]
-A INPUT -m state --state RELATED,ESTABLISHED -j ACCEPT
-A INPUT -p icmp -j ACCEPT
-A INPUT -i lo -j ACCEPT
-A INPUT -p tcp -m state --state NEW -m tcp --dport 22 -j ACCEPT
-A INPUT -p tcp --dport 3306 -j ACCEPT
-A INPUT -p tcp --dport 3307 -j ACCEPT
-A INPUT -p tcp --dport 4567 -j ACCEPT
-A INPUT -p tcp --dport 4568 -j ACCEPT
-A INPUT -p tcp --dport 4444 -j ACCEPT
-A INPUT -j REJECT --reject-with icmp-host-prohibited
-A FORWARD -j REJECT --reject-with icmp-host-prohibited
COMMIT#systemctl-restart-iptables">systemctl restart iptables
#systemctl-stop-firewalld">systemctl stop firewalld
#systemctl-disable-firewalld">systemctl disable firewalld
2 安装数据库和相关软件包
#yum-install-y-mariadb-mariadb-libs-mariadb-devel-mariadb-galera-common-mariadb-galera-server-galera-rsync">yum install -y mariadb mariadb-libs mariadb-devel mariadb-galera-common mariadb-galera-server  galera rsync

  #systemctl-enable-mariadb">systemctl enable  mariadb

  #systemctl-enable-rsyncd">systemctl enable  rsyncd
3 单节点初始化mysql数据库
[root@radiusone ~]# systemctl restart mariadb
[root@radiusone ~]# mysql_secure_installation
设置root用户远程使用密码password访问
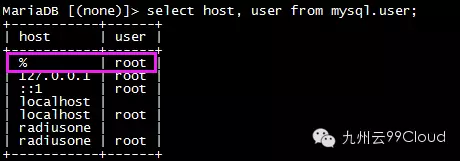
[root@radiusone ~]# mysql -u root –p
MariaDB [(none)]> grant all privileges on . to 'root'@'%' identified by 'password' with grant option;
MariaDB [(none)]> select host, user from mysql.user;
4 MariaDB Galera双主集群设置
#vim-etcmycnfdgaleracnf-27">vim /etc/my.cnf.d/galera.cnf +27
bind-address=0.0.0.0 --> bind-address=192.168.10.91/92
[root@radiusone ~]# vim /etc/my.cnf.d/server.cnf
[mysqld]
datadir=/var/lib/mysql
query_cache_size=0
binlog_format=ROW
default_storage_engine=innodb
innodb_autoinc_lock_mode=2
wsrep_provider=/usr/lib64/galera/libgalera_smm.so
wsrep_provider_options="gcache.size=1G"
wsrep_cluster_address=gcomm://#wsrepclusteraddressgcomm19216810911921681092">wsrep_cluster_address=gcomm://192.168.10.91,192.168.10.92
wsrep_cluster_name='dbcluster'
wsrep_node_address='192.168.10.91'
wsrep_node_name='radiusone'#wsrepsstmethodxtrabackup">wsrep_sst_method=xtrabackup
wsrep_sst_method=rsync
wsrep_sst_auth=username:Password
字段提示
wsrep_provider – If you are running on 32bit it will be in the /usr/lib otherwise on 64bit systems it will be in /usr/lib64
wsrep_cluster_address – Include all the addresses of the servers that will exist in the cluster. You can use hostnames if you wish
wsrep_cluster_name – This is the name of the cluster. All servers in the cluster must match names
wsrep_node_address – The IP address of this server
wsrep_node_name – The name of this server
wsrep_sst_auth – This is the username and password used to authenticate xtrabackup. Set this the same on all machines
[root@radiustwo ~]# vim /etc/my.cnf.d/server.cnf
[mysqld]
datadir=/var/lib/mysql
query_cache_size=0
binlog_format=ROW
default_storage_engine=innodb
innodb_autoinc_lock_mode=2
wsrep_provider=/usr/lib64/galera/libgalera_smm.so
wsrep_provider_options="gcache.size=1G"
wsrep_cluster_address=gcomm://192.168.10.91#wsrepclusteraddressgcomm19216810911921681092-1">wsrep_cluster_address=gcomm://192.168.10.91,192.168.10.92
wsrep_cluster_name='dbcluster'
wsrep_node_address='192.168.10.92'
wsrep_node_name='radiustwo'#wsrepsstmethodxtrabackup-1">wsrep_sst_method=xtrabackup
wsrep_sst_method=rsync
wsrep_sst_auth=username:Password[root@radiusone ~]# systemctl restart mariadb
[root@radiu
stwo ~]# systemctl restart mariadb
【按照下文附录中的Mariadb-galera HA集群启动顺序操作】
5 安装和配置keepalive
#yum-install-y-keepalived">yum install -y keepalived
# vim /etc/sysctl.conf
net.ipv4.tcp_keepalive_intvl=1
net.ipv4.tcp_keepalive_time=5
net.ipv4.tcp_keepalive_probes=5
net.ipv4.ip_forward=1
net.ipv4.ip_nonlocal_bind=1
net.bridge.bridge-nf-call-ip6tables=1
net.bridge.bridge-nf-call-iptables=1
net.bridge.bridge-nf-call-arptables=1#sysctl-p">sysctl -p
配置keepalive for VIP 192.168.10.99
[root@radiusone ~]# cat /etc/keepalived/keepalived.conf
! Configuration File for keepalivedglobal_defs {
notification_email {
zhangguoqingas@gmail.com
}
notification_email_from root@radiusone
smtp_server 127.0.0.1
smtp_connect_timeout 30
router_id radiusone
}vrrp_script check_haproxy {
script "killall -0 haproxy"
interval 2 # every 2 seconds
weight 2 # add 2 points if OK
}vrrp_instance VI_1 {
state MASTER
interface eth0
virtual_router_id 51
priority 100
advert_int 1
authentication {
auth_type PASS
auth_pass password
}
virtual_ipaddress {
192.168.10.99
}
}[root@radiustwo ~]# cat /etc/keepalived/keepalived.conf
! Configuration File for keepalivedglobal_defs {
notification_email {
zhangguoqingas@gmail.com
}
notification_email_from root@radiustwo
smtp_server 127.0.0.1
smtp_connect_timeout 30
router_id radiustwo
}vrrp_script check_haproxy {
script "killall -0 haproxy"
interval 2 # every 2 seconds
weight 2 # add 2 points if OK
}vrrp_instance VI_1 {
state BACKUP
interface eth0
virtual_router_id 51
priority 80
advert_int 1
authentication {
auth_type PASS
auth_pass password
}
virtual_ipaddress {
192.168.10.99
}
}#systemctl-restart-keepalived">systemctl restart keepalived
#systemctl-enable-keepalived">systemctl enable keepalived
可以查看当前VIP 192.168.10.99在radiusone[MASTER]主机上
[root@radiusone ~]# ip a
2: eth0: mtu 1500 qdisc pfifo_fast state UP qlen 1000
link/ether 08:00:27:fb:94:ea brd ff:ff:ff:ff:ff:ff
inet 192.168.10.91/24 brd 192.168.10.255 scope global eth0
valid_lft forever preferred_lft forever
inet 192.168.10.99/32 scope global eth0
valid_lft forever preferred_lft forever
inet6 fe80::a00:27ff:fefb:94ea/64 scope link
valid_lft forever preferred_lft forever[root@radiustwo ~]# ip a
2: eth0: mtu 1500 qdisc pfifo_fast state UP qlen 1000
link/ether 08:00:27:33:3d:f8 brd ff:ff:ff:ff:ff:ff
inet 192.168.10.92/24 brd 192.168.10.255 scope global eth0
valid_lft forever preferred_lft forever
inet6 fe80::a00:27ff:fe33:3df8/64 scope link
valid_lft forever preferred_lft foreve
当停止radiusone上的keepalive时,VIP会自动漂移至radiustwo上
[root@radiusone ~]# systemctl stop keepalived
[root@radiustwo keepalived]# ip a
2: eth0: mtu 1500 qdisc pfifo_fast state UP qlen 1000
link/ether 08:00:27:33:3d:f8 brd ff:ff:ff:ff:ff:ff
inet 192.168.10.92/24 brd 192.168.10.255 scope global eth0
valid_lft forever preferred_lft forever
inet 192.168.10.99/32 scope global eth0
valid_lft forever preferred_lft forever
inet6 fe80::a00:27ff:fe33:3df8/64 scope link
valid_lft forever preferred_lft forev
er[root@radiusone ~]# mysql -h 192.168.10.99 -u root -p
6 安装和配置haproxy
#yum-install-y-keepalived-haproxy">yum install -y keepalived haproxy

  #cat-etchaproxyhaproxycfg">cat /etc/haproxy/haproxy.cfg

  global

      log         192.168.10.92 local2
>chroot      /var/lib/haproxy
pidfile     /var/run/haproxy.pid
maxconn     4000
user        haproxy
group       haproxy
daemon

stats socket /var/lib/haproxy/stats
defaults
mode tcp
log global
option tcplog
option dontlognull
option redispatch
retries 3
timeout http-request 10s
timeout queue 1m
timeout connect 10s
timeout client 1m
timeout server 1m
timeout http-keep-alive 10s
timeout check 10s
maxconn 3000
添加数据库服务
#vim-etchaproxyhaproxycfg">vim /etc/haproxy/haproxy.cfg
listen galera_cluster
bind 192.168.10.99:3307
balance source
option tcpka
server radiusone 192.168.10.91:3306 check port 4567 inter 2000 rise 2 fall 5
server radiustwo 192.168.10.92:3306 check port 4567 inter 2000 rise 2 fall 5 backup##systemctl-restart-haproxy">systemctl restart haproxy
#systemctl-enable-haproxy">systemctl enable haproxy
7 测试连接数据库和检查集群状态

重点要检查的字段
SHOW GLOBAL STATUS LIKE ’wsrep_%’;
(1)SHOW GLOBAL STATUS LIKE ’wsrep_cluster_state_uuid’; 集群中每个节点的值必须一致。
(2)SHOW GLOBAL STATUS LIKE ’wsrep_cluster_size’; 显示集群的规模,此例应该显示”2”。
(3)SHOW GLOBAL STATUS LIKE ’wsrep_cluster_status’; 显示”Primary”为正常。
(4)SHOW GLOBAL STATUS LIKE ’wsrep_ready’; 显示”ON”为正常。
(5) SHOW GLOBAL STATUS LIKE ’wsrep_connected’; 显示”ON”为正常。
(6) SHOW GLOBAL STATUS LIKE ’wsrep_local_state_comment’; 显示” Joined”为正常。
至此,MariaDB Galera双主Cluster构建完成,接下来即可参考官方文档完成freeradius和daloradius以及vpn-l2tp的部署,实现基于freeradius认证的VPN集群系统。
三 附录
1 Mariadb-galera HA集群启动顺序
https://mariadb.com/kb/en/mariadb/starting-and-stopping-mariadb/

https://mariadb.com/kb/en/mariadb/galera-cluster-status-variables/
2 HA
(1)关闭或者重启slave节点radiustwo,检查能否使用VIP:3307正常访问数据库;【通过】
(2)关闭或者重启master节点radiusone,检查能否使用VIP:3307正常访问数据库;【通过】
(3)将master(radiusone)和slave(radiustwo)节点全部关闭,启动后,检查能否使用VIP:3307正常访问数据库。【按照上面集群启动的顺序来操作】
3 集群排查错误

主要参考:http://galeracluster.com/documentation-webpages/galera-documentation.pdf
